Speedbag Setup Gudelines – Hints & Tips
Setting Up a Speed Bag
Speed bag Setup
To ensure that you get the most out of your Speed Bag,
it is VERY IMPORTANT
that you spend a bit of time settting it up CORRECTLY
The Speed Bag is a relatively simple piece of gym equipment to setup, but there are a number of different setup factors that you will need to consider to ensure that you have the best possible Speed Bagging experience :

Stability
Probably THE most important aspect of your Speed Bag Setup is Stability. If the platform is not rock steady – with little or no vibration when the bag is hit – you will find it much more difficult to use effectively.
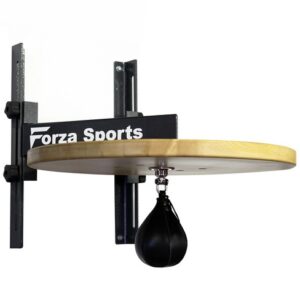
Stability is largely determined by the quality of the mounting hardware, and whatever surface it is attached to, but the size and density of the rebound board also plays a part.
 Traditionally Speed Bags have been mounted to a solid brick/concrete wall with chunky steel mounting hardware, and this is probably the best option if it is available. However, uyou can also get reasonably good stability with wooden mounting harware – as long as it is securely bolted to studs in a plasterboard wall. Steel posts, solidly bolted to a concrete floor can also provide excellent stability, with suitable post mounting hardware.
If you are getting some movement/vibration when hitting the bag, often adding weights and/or sandbags to the top of the drum can dampen the vibrations and provide signficant improvement.
Sometimes mounting platforms include a variable hight mechanism – which provides great flexibility for adjusting the height but sometimes this comes at the cost of less stability.
Note: for MultiBag setups, you may like to consider a specialty designed Multibag Mount.
Height
The height of your speedbag will influence how you hit it and how easy it is for you to use. Using a SpeedBag that is set at an improper height can be a frustrating experience.
 Ideally, the height of the “belly” (fattest part) of the bag should be about level with your nose mouth, and slightly higher is probably better than lower.
If setting up a Speedbag at home you will get to decide the ideal height for you (assuming multiple people don’t need to use it), but in a gym situation you may need to compromise on what is avaliable.
Speedbag platforms sometimes come with a mechanism for adjusting the height. This provides great flexibility if a vareity of different people will be using it, but often comes at the cost of lower stability. A gym may have a number of speedbags setup at different heights, or they may have adjustbale height setups.
For a MultiBag setup (which may require specially designed Multibag Mounts) you will also need to decide wether you want to setuip bags at the one height (which is easier to use) or at different heighst (which is more challenging, but arguably a better training experience)..
Rebound Board (Drum)
Rebound Boards (or Drums) come in many variations, but are usually round (typically between 60cm (24″) and 90cm (36″)) and made of wood…but they can be square… or other shapes… or made of other materials.
The most important aspect of the rebound board is stability.. it needs to be FIRMLY attached to the mount and have little or no vibration when hit by the bag.
The rebound board is typically made of a fairly dense material and usually has a smooth hard surface, to maximise the bounce.
Bag
The Speed bag itself is made up of two separate components : an external leather (or Polyurethane) covering and an internal air-bladder.

Although typically “tear drop” in shape, Speedbags can come in an assortment of shapes and various sizes ranging from the large 13×10″ (33×25 cm) and 12×9″, midsize 11×8″, 10×7″ (25×18 cm) and 9×6″, to the small 8×5″, 7×4″ and 6×4″ (15×10 cm). Generally the larger the bag, the slower it is and the more force is required to keep it going.
- Small Bags – are VERY fast and are better of for experuienced baggers because they require precise control. Smaller bags are ideal to focus on faster hand speed, timing and coordination
- Medium sized bags – are probably the best choice for learning, because they provide decent speed and are easier to control. These are probably also the best choice for most Speedbag Training Workouts
- Large bags – need more punching force to get moving and keep going. They tend to move a bit slower and are best for Strength, Endurance and Fitness training.
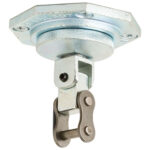
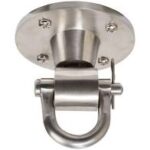
Swivel
The Swivel is the mechanism which attaches the Bag to the centre of Drum. It needs tyo provide a from attachement, but also minimise and retsrtiction in motion.
Swivels come in a variety of types
 Ball hook swivel are the simplest type, and have been around for many years. They are easy to set up and add/remove the bag. However, they can be noisy.
 Chain link swivels tend to be quiter but may get squeaky over a period of time (this can usually be resolved with a little spray lubricant).
 U-Bolt (aka D-bolt) swivels have a ball bearing design so you get fast and accurate rebounds. They typically have a locking pinnmaking iot pretty easy to add/remove the bag. These tend to be the ones most readily available commercially at the moment.
The “best” type for you to use will depend on your own preferences and bagging style… and how often you want to chaneg your bags around. Begginers will probably not nptce any diofference, but experienced baggers may have a form preference.
Space
One great advantage of Speed Bag equipment is that it doesn’t require a great deal of space…. However, if you are setting up at home, space may be limited.
If possible you should try to setup in an area where you have at least 1.5m (and ideally 2m or more) space in a 180° arc around a wall mounted speed bag, or 270° arc around a post mounted Speed Bag. This will give you room to move in, out and around the bag.
Floor
 If you are setting up in a commercial gym you probably already have a decent floor surface, but if you are setting up your speed bag at home, there are some options that you shoud consoder.

Ideally the floor surface would be solid, but with some give to it. The high density rubber mats often used in commercial gyms are ideal…At home, you may be a bit more limited though.
A solid concrete floor is OK.. but not ideal, as it is harder on your legs and you are likely to fatigue quicker. A wooden floor will have more give… but a wooden deck or verandah (for example) may be a little too springy. Consider adding carpet or a mat (1m square carpet tiles are reasonably cheap and very effective)… and you could also add an underlay of cheap foam rubber tiles – which creates a softer but still very solid surface.
MultiBag Considerations
All the above factors are relevant to a MultiBag (2 or more Speed Bags), but there are some other complexities to take into consideration :
- Mount – you may need a specially designed mount to properly cater for MultiBag setup. 2 Bags can probably be setup OK if post mounted, but 3 bags, or wall mounted setup may require a special mount.
- Height – you will need to decide if all bags are mounted at the same height, or whether there is some variation in the hieghts of different bags. Bags at the same level are probably easeir to use, but whilst different level bags are more challenging they also offer a better training experience (particularly for reflexes, coordination and peropheral vision). You felxibility with height will depend on the capability of the mount/s you are using.
- Rebound Dynamics – different drums, swivels and bags will have different bounce dynamics. In fact even “identical” bag/drum/swivel combinations may very well have different bounce dynamics because of variations in air pressure of the bag and natural variations in the leather. You may choose to have similar setups for each bag/drum/swivel or you may choose for them to be very different. Different combinations will be more challenging, but will probably offer a better training experience.